
I'm seeing the new year in with 2 sick babies and a puppy chewing my toes!
Here is a page I recently scrapped for Craft Queen Nicole sent me a gorgeous Christmas package, I just love those laces! Enjoy your New Year celebrations! Leah
 Boys are the hardest to make for! (Especially grown boys who are actually men but you still call them boys because they are your brothers.) I had some crochet skulls that I decided to make bodies for. Then they grew into funny little creatures all on their own. When the hat and buttons went onto this one I thought he looked kind of Victorian - like an undertaker or Scrooge from A Christmas Carol!
 This one got a hat and some buttons but I still felt he needed something else. Some twig arms were added and voila - a gothic snowman!
 I also crocheted some purple and red flower pins for my mum and auntie who are members of the Red Hat Society. Unfortunately I forgot to photograph them, but I will hopefully make more in the New Year and post about them then. (Some more handmade gifts to share in the next post!)


 The last gift I got to open is from Debra Cooper. It's a sweet stuffed birdie with a gorgeous beaded tassel. I love the bright colours Debra has used on this piece. How sweet will this look hanging from a christmas tree - I really must sort one out for next year!
 I love the sparkly beads and the crochet strands in the tassel! Thank you so much Debra!
 And, now that everyone in the exchange has opened theirs, I can share the secret Day 13 gift! It's from Lelainia Lloyd, our lovely hostess and organiser.
 Look at the way that glitter sparkles :) Thanks Lelainia for such a thoughtful gift, and for organising such a fantastic swap - it's a highlight of my christmas every year!


.jpg) Hello, here is a pic of a little gift I've posted off for a craft christmas swap, and........
Hello, here is a pic of a little gift I've posted off for a craft christmas swap, and.........jpg)
 This trio of cuties is from Barbara Atwell. They are made from vintage photos printed onto paper, then stitched and stuffed. So cute!
 I love the glitter on this girl's hat! Thanks Barbara!
 Today's gift is from Lisa Ryder. Lisa sent some amazing art pieces, including a collaged canvas (background) in beautiful muted hues...
 And a fabulous set of ATCs! I spent ages looking at these yesterday, before coming down with a bad headache (NOT brought on by presents!) which is why I'm late posting.
 Thanks for all this arty goodness Lisa, I'm thrilled to have it all in my collection!
 Here is yet another beautiful gift. This one (well two actually) is from Fiona Mortimore. The ornament is made of printed linen fabric with lovely hand-stitched embellishments. I love the fabric - brilliant red contrasting with natural linen, just beautiful! Fiona also sent a bookmark which I am using already - it's nice and big so should stay in my book, rather than falling out as scraps of paper tend to do! Thank you very much Fiona!
 This little pouch is from Dawn Supina and it's made from an altered tie!

 Today was my day - number six! I sent everyone a crochet cuff bracelet. They were made in different colours according to people's favourite colours. (As you can see, a lot of people like red and aqua!)
 I wasn't left out, however. I got to open the lucky #13 gift from Lelainia Lloyd, which each person in the swap opens on the day everyone else is opening their gift. I have to keep the contents a secret until everyone else has opened theirs though... but trust me when I say it's a wonderful thoughtful present. Thanks Lelainia!
.jpg)
.jpg) I love these little faces!!!
I love these little faces!!! Here we have a lovely collaged wallet from Arlene Travnik. The top layer is a sheer white organza and there are beads and buttons and charms all trapped within pockets under the fabric. Perfect for a distraction while waiting in line at the checkout! (I have been playing with it all afternoon anyway!) Thanks Arlene!

.jpg) This gorgeous boy got a fantastic school report today! Well done Harry!
This gorgeous boy got a fantastic school report today! Well done Harry!.jpg) And this one has now finished kinder, he is off to school very soon too! I was not successful at getting a Christmas pic of them all together, I will try again tomorrow. Thanks for dropping in! Leah
And this one has now finished kinder, he is off to school very soon too! I was not successful at getting a Christmas pic of them all together, I will try again tomorrow. Thanks for dropping in! Leah I made these little trees for the Kiwi Christmas Ornament Swap. They were such fun that I thought I'd share the process in a tutorial.
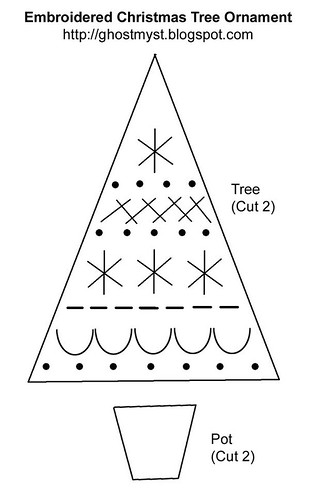 (Click here to get the full sized pattern)


 When you are about 1.5cm from the top, take a piece of ribbon about 17cm long. Fold it in half and pinch the 2 ends between the felt and backing fabric. Hold it in place as you stitch around the top of the tree.
 When you get back to the bottom of the tree, stitch about 1cm past the corner. Then fill with stuffing. Use a paintbrush or something similar to push little wads of stuffing into the corners.
 Insert the pot into the gap and continue stitching to close the gap.
 To finish off, tie a bow at the top with matching ribbon. Secure at the back with a dab of glue if neccessary.